setContentView
只要你使用过Activity,那么你一定使用过setContentView这个方法。一般都是这样调用该方法:
setContentView(R.layout.main);
然后,在手机或者模拟器上就可以看见自己的布局。
如果,你留意的话,setContentView还有很多过载方法:
public void setContentView(int layoutResID) { getWindow().setContentView(layoutResID); } public void setContentView(View view) { getWindow().setContentView(view); } public void setContentView(View view, ViewGroup.LayoutParams params) { getWindow().setContentView(view, params); } 那么,getWindow()方法是做什么的呢?一探究竟:
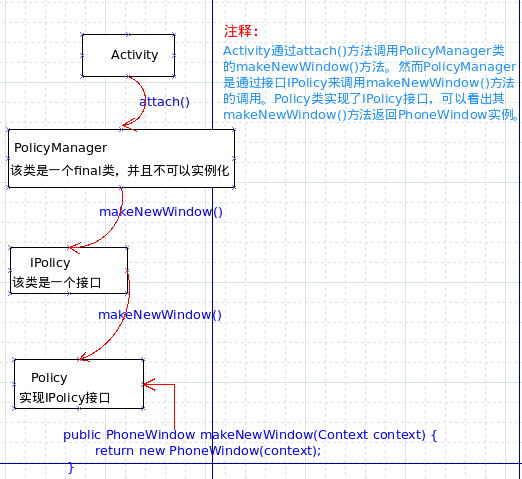
public Window getWindow() { return mWindow; } 可以看出,该方法返回一个Window实例。但是Window是一个抽象类啊,怎么可以有实例对象???原来,Window类有一个子类PhoneWindow,那么如何得知getWindow返回的是PhoneWindow实例呢?来,看下面这张图:

至此,您应该明白setContentView()方法是调用PhoneWindow类的同名方法。源码如下:
@Override public void setContentView(int layoutResID) { if (mContentParent == null) { installDecor(); } else { mContentParent.removeAllViews(); } mLayoutInflater.inflate(layoutResID, mContentParent); final Callback cb = getCallback(); if (cb != null) { cb.onContentChanged(); } } @Override public void setContentView(View view) { setContentView(view, new ViewGroup.LayoutParams(MATCH_PARENT, MATCH_PARENT)); } @Override public void setContentView(View view, ViewGroup.LayoutParams params) { if (mContentParent == null) { installDecor(); } else { mContentParent.removeAllViews(); } mContentParent.addView(view, params); final Callback cb = getCallback(); if (cb != null) { cb.onContentChanged(); } } 每个Activity都会实例化一个Window并且只有一个,而View就像是贴在Window上的装饰品。窗户(Window)只有一个,但是窗花(View)可以有很多。
LayoutInflater
获得 LayoutInflater 实例
LayoutInflater inflater = getLayoutInflater();LayoutInflater localinflater =(LayoutInflater)context.getSystemServie(Context.LAYOUT_INFLATER_SERVICE); LayoutInflater inflater = LayoutInflater.from(context);
对于第一种,主要是调用 Activity 的 getLayoutInflater() 方法。
继续跟踪研究 android 源码,Activity 中的该方法是调用 PhoneWindow 的 getLayoutInflater()方法!
public PhoneWindow(Context context) { super(context); mLayoutInflater = LayoutInflater.from(context);} 可以看出它其实是调用 LayoutInflater.from(context), 那么该方法其实是调用第二种方法,看看源码,如下:
/** * Obtains the LayoutInflater from the given context. */ public static LayoutInflater from(Context context) { LayoutInflater LayoutInflater = (LayoutInflater) context.getSystemService(Context.LAYOUT_INFLATER_SERVICE); if (LayoutInflater == null) { throw new AssertionError("LayoutInflater not found."); } return LayoutInflater; } inflate 方法
inflate 原意是充气之类的,在这里主要意思就是,扩张、使之膨胀。换句话说就是将当前视图view补充完整、扩展该视图。
public View inflate (int resource, ViewGroup root)public View inflate (XmlPullParser parser, ViewGroup root)public View inflate (XmlPullParser parser, ViewGroup root, boolean attachToRoot)public View inflate (int resource, ViewGroup root, boolean attachToRoot)
示例代码:
LayoutInflater inflater = (LayoutInflater)getSystemService(LAYOUT_INFLATER_SERVICE);/* R.id.test 是 custom.xml 中根(root)布局 LinearLayout 的 id */View view = inflater.inflate(R.layout.custom,(ViewGroup)findViewById(R.id.test));/* 通过该 view 实例化 EditText对象, 否则报错,因为当前视图不是custom.xml.即没有 setContentView(R.layout.custom) 或者 addView() *///EditText editText = (EditText)findViewById(R.id.content);// errorEditText editText = (EditText)view.findViewById(R.id.content);
对于上面代码,指定了第二个参数 ViewGroup root,当然你也可以设置为 null 值。
注意:该方法与 findViewById 方法不同。
inflater 是用来找 layout 下 xml 布局文件,并且实例化!而 findViewById() 是找具体 xml 下的具体 widget 控件(如: Button,TextView 等)。
postInvalidate() (参考)
在子线程中控制UI:
@Override protected void onRestart() { super.onRestart(); /*onRestart中开启新线程,更新UI*/ Thread thread = new Thread(new Runnable() { @Override public void run() { System.out.println(Thread.currentThread().getName() + ": " + Thread.currentThread().getId()); tv.postInvalidate(); btn.postInvalidate(); tv.setText("update UI is success!"); btn.setText("update UI is success!"); }}); thread.start(); } postInvalidate() 方法,源码:
public void postInvalidate() { postInvalidateDelayed(0); } public void postInvalidateDelayed(long delayMilliseconds) { // We try only with the AttachInfo because there's no point in invalidating // if we are not attached to our window if (mAttachInfo != null) { Message msg = Message.obtain(); msg.what = AttachInfo.INVALIDATE_MSG; msg.obj = this; mAttachInfo.mHandler.sendMessageDelayed(msg, delayMilliseconds); } } 其实,是调用了 Handler 的处理消息的机制!该方法可以在子线程中直接用来更新UI。但是在 Button 的事件中开启线程,更新 UI就会报错报异常。
Handler 和 invalidate 方法结合多线程更新 UI
方法 invalidate 主要用在主线程中(即UI 线程中),不可以用于子线程。如果在子线程中需要使用 postInvalidate 方法。
public void invalidate() { if (ViewDebug.TRACE_HIERARCHY) { ViewDebug.trace(this, ViewDebug.HierarchyTraceType.INVALIDATE); } if ((mPrivateFlags & (DRAWN | HAS_BOUNDS)) == (DRAWN | HAS_BOUNDS)) { mPrivateFlags &= ~DRAWN & ~DRAWING_CACHE_VALID; final ViewParent p = mParent; final AttachInfo ai = mAttachInfo; if (p != null && ai != null) { final Rect r = ai.mTmpInvalRect; r.set(0, 0, mRight - mLeft, mBottom - mTop); // Don't call invalidate -- we don't want to internally scroll // our own bounds p.invalidateChild(this, r); } } } invalidate 方法如果你直接在主线程中调用,是看不到任何更新的。需要与Handler结合!
Android 在 onDraw 事件处理绘图,而 invalidate() 函数可以再一次触发 onDraw 事件,然后再一次进行绘图动作。
public class MasterActivity extends Activity { static int times = 1; /** Called when the activity is first created. */ @Override public void onCreate(Bundle savedInstanceState) { super.onCreate(savedInstanceState); setContentView( new View(null){ Paint vPaint = new Paint(); //绘制样式物件 private int i = 0; //弧形角度 @Override protected void onDraw (Canvas canvas) { super.onDraw(canvas); System.out.println("this run " + (times++) +" times!"); // 设定绘图样式 vPaint.setColor( 0xff00ffff ); //画笔颜色 vPaint.setAntiAlias( true ); //反锯齿 vPaint.setStyle( Paint.Style.STROKE ); // 绘制一个弧形 canvas.drawArc(new RectF(60, 120, 260, 320), 0, i, true, vPaint ); // 弧形角度 if( (i+=10) > 360 ) i = 0; // 重绘, 再一次执行onDraw 程序 invalidate(); } }); } } 经过测试,发现 times 一直在++,说明 onDraw 被多次调用,并且一直在画图!
注释掉的话:
// 重绘, 再一次执行onDraw 程序 //invalidate();

可以看出,图像只画了一条线,说明onDraw()方法被调用一次。从log上也可以看出来:
D/mark ( 221): this run onDraw() 1 times!
那么,是什么力量促使onDraw()方法被调用呢?
setContentView()View view方法,其实是调用PhoneWindow的setContentView(View view)方法,调用关系如下:

从而可以看出,invalidate()方法是促使onDraw()方法被调用的力量。
那么,修改代码,将内部类MyView的onDraw()方法中的invalidate()注释取消,再看看运行效果:


控制台:
D/mark ( 248): this run onDraw() 5629 times! D/mark ( 248): this run onDraw() 5630 times! D/mark ( 248): this run onDraw() 5631 times! D/mark ( 248): this run onDraw() 5632 times! D/mark ( 248): this run onDraw() 5633 times! D/mark ( 248): this run onDraw() 5634 times! D/mark ( 248): this run onDraw() 5635 times! D/mark ( 248): this run onDraw() 5636 times! D/mark ( 248): this run onDraw() 5637 times! D/mark ( 248): this run onDraw() 5638 times! D/mark ( 248): this run onDraw() 5639 times! D/mark ( 248): this run onDraw() 5640 times! D/mark ( 248): this run onDraw() 5641 times! D/mark ( 248): this run onDraw() 5642 times! D/mark ( 248): this run onDraw() 5643 times! D/mark ( 248): this run onDraw() 5644 times! D/mark ( 248): this run onDraw() 5645 times! D/mark ( 248): this run onDraw() 5646 times!
可以看出,invalidate()方法使onDraw()一直被调用,实现重绘的效果。
在invalidate()方法源码中,有这么一段注释:
/** * Invalidate the whole view. If the view is visible, { @link #onDraw} will * be called at some point in the future. This must be called from a * UI thread. To call from a non-UI thread, call { @link #postInvalidate()}. */ 这段话,说明了上面的实现(调用onDraw()方法)。但是在子线程中必须使用postInvalidate()方法。
invalidate()源码分析
public class ViewDrawTestActivity extends Activity { // 用于测试 static int times = 1; @Override public void onCreate(Bundle savedInstanceState) { super.onCreate(savedInstanceState); MyView mView = new MyView(this); mView.invalidate(); //setContentView(mView); } /** * 内部类,继承View * * @author mark */ class MyView extends View { MyView(Context context) { super(context); } Paint vPaint = new Paint(); // 绘制样式物件 int i = 0; // 弧形角度 @Override protected void onDraw(Canvas canvas) { super.onDraw(canvas); Log.d("mark", "this run onDraw() " + (times++) + " times!"); // 设定绘图样式 vPaint.setColor(0xff00ffff); // 画笔颜色 vPaint.setAntiAlias(true); // 反锯齿 vPaint.setStyle(Paint.Style.STROKE); // 绘制一个弧形 canvas.drawArc(new RectF(60, 120, 260, 320), 0, i, true, vPaint); // 弧形角度 if ((i += 10) > 360) { i = 0; } // 重绘, 再一次执行onDraw 程序 // invalidate(); } } } 子没有多大的变化,只是在onCreate()方法中直接调用invalidate()方法,如:
mView.invalidate();
这样做的目的主要是想看看,自己调用View的invalidate()方法会不会触发onDraw()方法。运行一下:

nDraw()方法并没有执行!那么是不是因为没有调用setContentVIew()方法呢?修改onCreate()方法:
@Override public void onCreate(Bundle savedInstanceState) { super.onCreate(savedInstanceState); MyView mView = new MyView(this); mView.invalidate(); setContentView(mView); mView.invalidate(); } 再次运行,效果:

D/mark ( 251): this run onDraw() 1 times!
说明,只有setContentVIew()方法中的invalidate()方法启了作用,自己调用View的invalidate()方法,mView.invalidate()没启任何作用。但是,在MyView的onDraw()方法中调用invalidate()方法可以循环调用onDraw()方法,类似递归。
分析一下,invalidate()方法的源码吧,在这里也许可以找到答案。
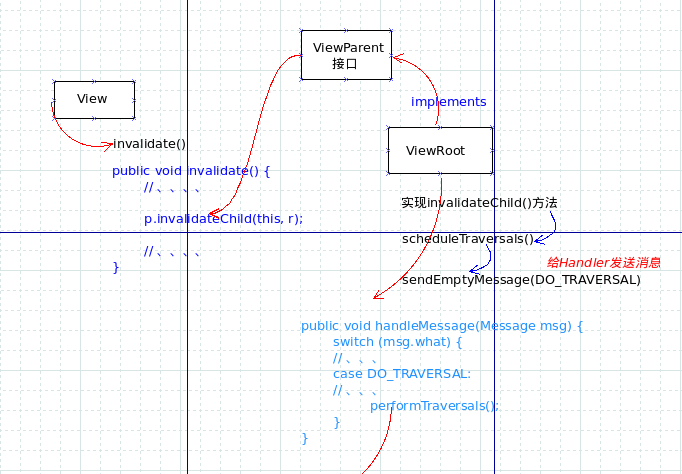
/** * Invalidate the whole view. If the view is visible, { @link #onDraw} will * be called at some point in the future. This must be called from a * UI thread. To call from a non-UI thread, call { @link #postInvalidate()}. */ public void invalidate() { if (ViewDebug.TRACE_HIERARCHY) { ViewDebug.trace(this, ViewDebug.HierarchyTraceType.INVALIDATE); } if ((mPrivateFlags & (DRAWN | HAS_BOUNDS)) == (DRAWN | HAS_BOUNDS)) { mPrivateFlags &= ~DRAWN & ~DRAWING_CACHE_VALID; final ViewParent p = mParent; final AttachInfo ai = mAttachInfo; if (p != null && ai != null) { final Rect r = ai.mTmpInvalRect; r.set(0, 0, mRight - mLeft, mBottom - mTop); // Don't call invalidate -- we don't want to internally scroll // our own bounds p.invalidateChild(this, r); } } } 这里可以看到p.invalidateChild(this, r)(看源码只看关键部分,不然你会很晕!),其中p是ViewParent实例对象。ViewParent是一个接口,现在我们关心谁实现了这个接口?
通过千辛万苦的search,终于找到ViewParent的实现类ViewRoot:
/** * The top of a view hierarchy, implementing the needed protocol between View * and the WindowManager. This is for the most part an internal implementation * detail of { @link WindowManagerImpl}. * * {@hide} */ @SuppressWarnings({ "EmptyCatchBlock"}) public final class ViewRoot extends Handler implements ViewParent, View.AttachInfo.Callbacks { } 那么,看看该类实现的invalidateChild()方法:
public void invalidateChild(View child, Rect dirty) { checkThread(); if (DEBUG_DRAW) Log.v(TAG, "Invalidate child: " + dirty); if (mCurScrollY != 0 || mTranslator != null) { mTempRect.set(dirty); dirty = mTempRect; if (mCurScrollY != 0) { dirty.offset(0, -mCurScrollY); } if (mTranslator != null) { mTranslator.translateRectInAppWindowToScreen(dirty); } if (mAttachInfo.mScalingRequired) { dirty.inset(-1, -1); } } mDirty.union(dirty); if (!mWillDrawSoon) { scheduleTraversals(); } } 关键代码在这儿:
if (!mWillDrawSoon) { scheduleTraversals(); } 这个方法是向Handler发送消息:
public void scheduleTraversals() { if (!mTraversalScheduled) { mTraversalScheduled = true; sendEmptyMessage(DO_TRAVERSAL); } } 接下来,看看ViewRoot的Handler的handleMessage的实现:
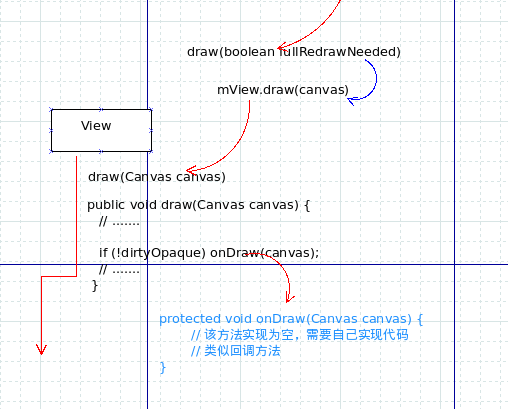
public void handleMessage(Message msg) { switch (msg.what) { // 、、、 case DO_TRAVERSAL: // 、、、 performTraversals(); } } performTraversals()方法,调用ViewRoot的私有方法private void draw(boolean fullRedrawNeeded),在该方法中有句代码很关键:
mView.draw(canvas);
其实这句代码,就是调用View的draw()方法 ,关键代码:
if (!dirtyOpaque) onDraw(canvas);
也就是说,满足这个方法,就会回调onDraw()方法。到此为止,您应该明白,当我们自己调用invalidate()方法时,想使onDraw()方法回调,必须满足条件。
调用关系,请看草图!


我是天王盖地虎的分割线
剧终!参考:http://blog.csdn.net/veryitman/article/details/6695516